

BLOG
How to Update WordPress Plugins Safely: A Step-by-Step Guide
4 min read
Matrix is proud to join PACE, now launched in Moldova. The Erasmus+ project strengthens youth organisations across the region with training, digital resources and collaboration to support displaced Ukrainian young people.
Updating WordPress plugins is one of the most routine maintenance tasks on any site — and one of the most frequently mishandled. The temptation is to open the dashboard, click “Update All”, and move on. That approach works fine right up until the moment it doesn’t, and when it goes wrong, it tends to go wrong in front of real visitors, on a live site, without a safety net.
A broken plugin update is one of the most common causes of unexpected website downtime. The good news is that it is almost entirely preventable with a structured approach. This guide covers the complete safe update process — from backup to staging to post-update verification — along with guidance on auto-updates, rollbacks, and when to stop updating and start investigating.
Why Keeping Plugins Updated Matters
The case for updating plugins is straightforward but worth stating clearly, because many site owners treat updates as optional rather than essential.
Security is the primary driver. According to Patchstack’s State of WordPress Security report, the overwhelming majority of WordPress vulnerabilities are found in plugins rather than in core. When a security researcher discovers a vulnerability in a plugin and reports it responsibly to the developer, the developer releases a patched version. The moment that patch is released, the vulnerability becomes public knowledge — and attackers begin scanning for sites still running the unpatched version. The window between a vulnerability being disclosed and it being actively exploited is shrinking every year.
Compatibility is the second reason. WordPress core is updated regularly, and major releases introduce changes to the APIs and functions that plugins depend on. Plugins that are not updated to match the new core version will eventually conflict with it — producing errors, broken functionality, or the white screen that nobody wants to see. The longer a plugin goes without updates, the more likely it is to conflict with an updated core or with other updated plugins.
Performance is the third. Plugin developers continuously optimise their code. Updated plugins tend to be leaner, faster, and better structured than older versions — contributing to the page load performance that affects both user experience and Google’s Core Web Vitals ranking signals.
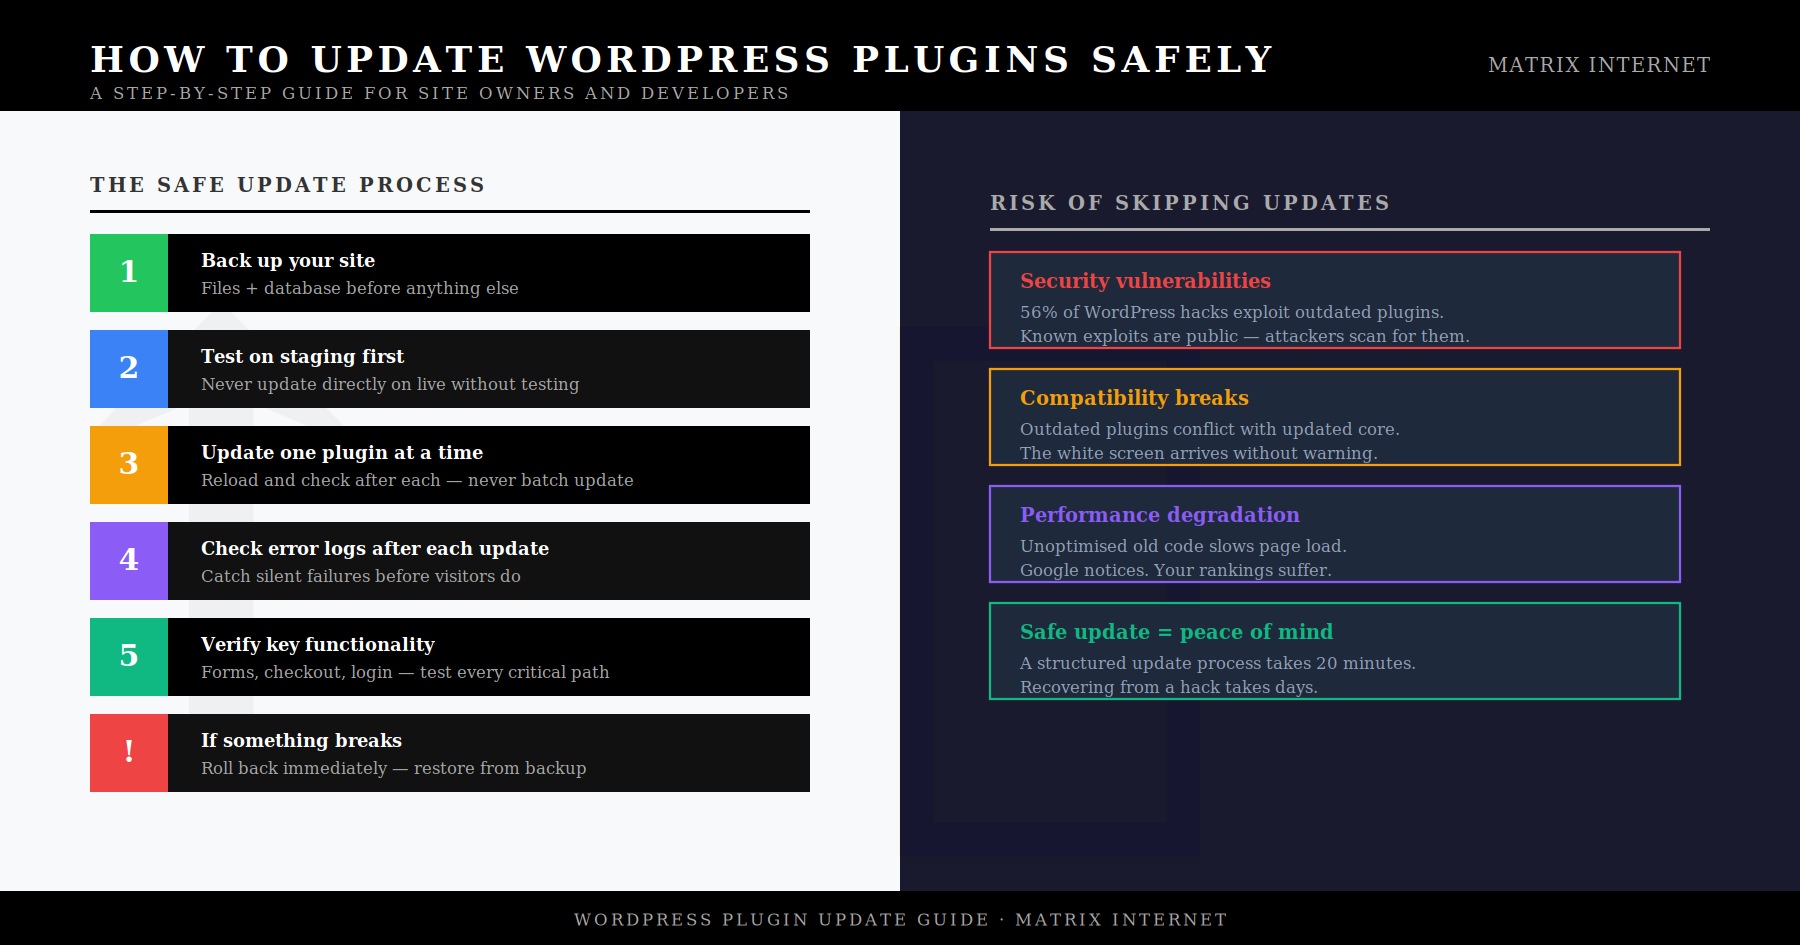
Before You Update Anything: Back Up Your Site
This is the rule that has no exceptions. Every plugin update — regardless of how minor it appears — should be preceded by a complete backup of your site: files and database. A backup is your only guaranteed way to restore a working site if an update breaks something, and without one you are making irreversible changes to a live system with no fallback.
The most reliable backup tools for WordPress are:
UpdraftPlus — the most widely used WordPress backup plugin, with free and premium tiers. Backs up to remote storage including Google Drive, Amazon S3, Dropbox, and others. Scheduled automated backups plus on-demand backups before updates are the recommended configuration.
Your hosting provider’s backup tool — most managed hosting providers (SiteGround, WP Engine, Kinsta, Hostinger) include automated daily backups and one-click restore functionality from the hosting control panel. Know where these are before you need them.
BackWPup — a free alternative to UpdraftPlus with strong scheduling functionality and remote storage support.
Take a manual backup immediately before any significant update session. Do not rely solely on the most recent scheduled backup — it may be from the previous night, after which you may have added content or configuration changes you do not want to lose.
Step 1: Read the Changelog Before You Update
The changelog is the developer’s record of what changed between versions. For most minor updates — patch releases like 3.2.1 to 3.2.2 — the changelog will describe a small number of bug fixes or security patches, and you can proceed with confidence. For major version bumps — like 3.x to 4.0 — the changelog may describe significant changes to how the plugin works, deprecated features, or new requirements that affect compatibility.
In the WordPress dashboard, the changelog is accessible by clicking the “View version X details” link next to any plugin with an available update. On the WordPress Plugin Repository, the changelog is a dedicated tab on every plugin’s page.
Developing the habit of reading changelogs before updating takes thirty seconds per plugin and has saved countless site owners from surprises they could have anticipated.
Step 2: Use a Staging Environment
A staging site is an identical copy of your live site running in a private environment — same files, same database, same configuration — where you can test updates before applying them to the live site. If an update breaks something on staging, you fix it there, or you hold off on the update until the developer releases a resolution. Your live site never sees the problem.
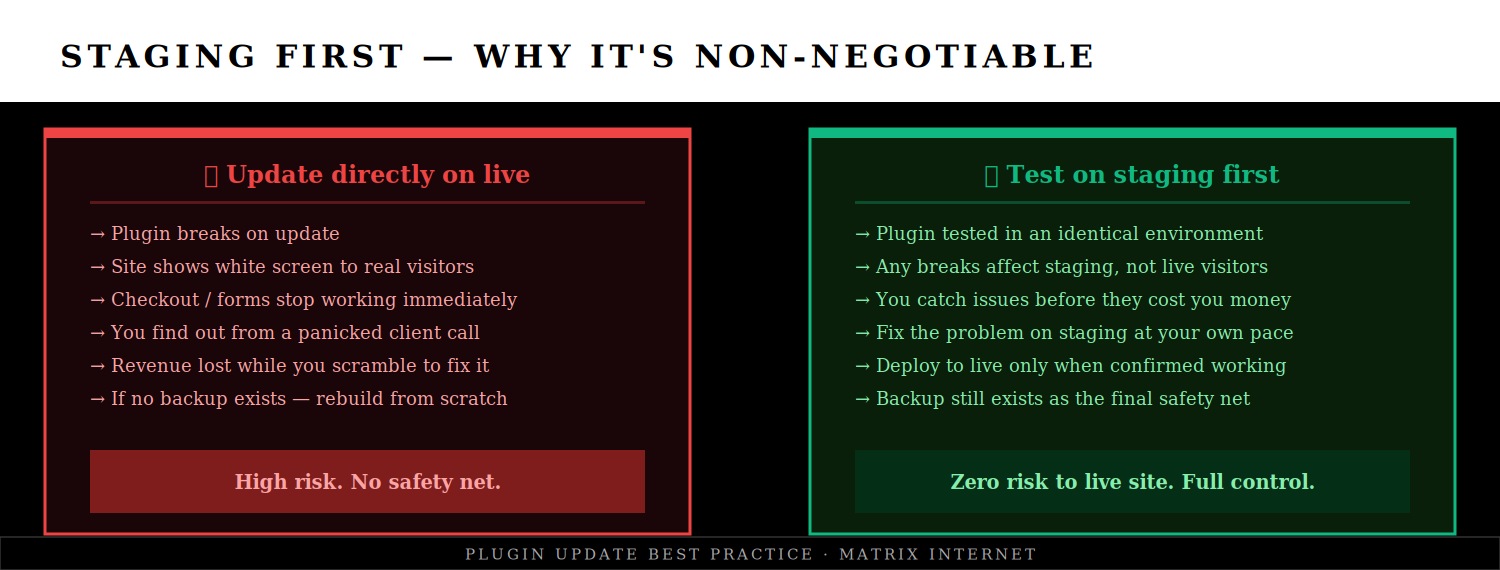
Most managed WordPress hosting providers include one-click staging environments. SiteGround, WP Engine, Kinsta, and Cloudways all provide staging with straightforward deploy-to-live functionality. If your host does not provide staging, the WP Staging plugin creates a local staging clone on the same server, which is better than nothing — though a separate server environment is preferable for accurate testing.
For sites built with significant custom functionality, professionally developed and maintained WordPress sites typically include a staging workflow as standard, where all updates are tested in an isolated environment before any changes reach the live site.
The process on staging is identical to what you would do on live: apply updates one at a time, test thoroughly after each, and only deploy to live once you have confirmed that everything works correctly.
Step 3: Update One Plugin at a Time
This is the most important operational rule in the entire guide. Never use the “Update All” button — not even when all the updates look minor. When you update multiple plugins simultaneously, you lose the ability to identify which update caused a problem if something breaks.
Update one plugin. Reload the site. Check the front end and the admin dashboard. Verify that key functionality is still working. Then update the next plugin. The extra time this takes — perhaps ten minutes for a site with fifteen pending updates — is negligible compared to the diagnostic time you save if something goes wrong.
Prioritise your update order as follows:
Security patches first. If a plugin has a known security vulnerability, updating it should happen as soon as possible, even if that means updating it in isolation on the live site rather than waiting for your next scheduled staging session. The risk of leaving a known vulnerability unpatched outweighs the risk of the update itself.
Critical plugins second. WooCommerce, your page builder (Elementor, Divi, Beaver Builder), your caching plugin, and your SEO plugin have the broadest impact on site functionality. Update these with the most care and the most thorough post-update testing.
Utility plugins last. Redirect managers, image optimisers, social sharing plugins, and similar utility tools have fewer dependencies and lower conflict risk. These can typically be updated with less ceremony, though always one at a time.
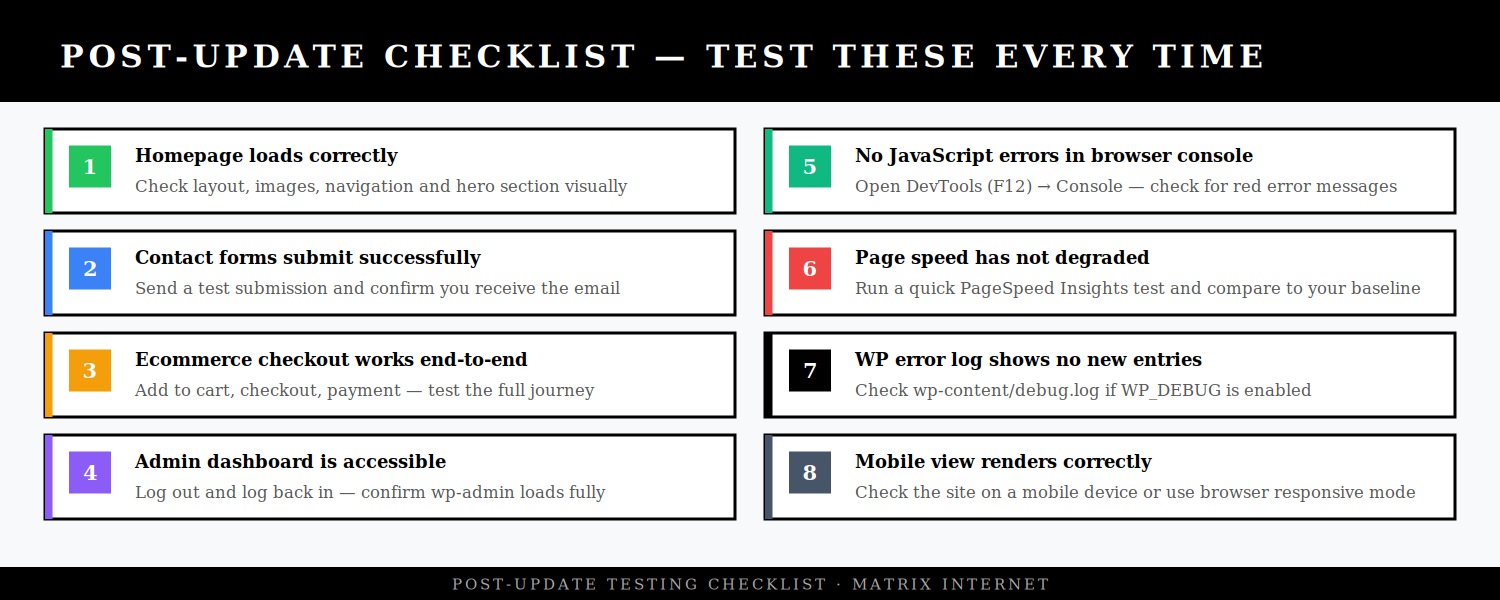
Step 4: Verify After Every Update
After each individual plugin update, run through a quick functional check. The depth of this check should match the plugin’s scope — a WooCommerce update warrants a full checkout test, while an update to a redirect manager warrants checking that your key redirects are still working.
At a minimum, after every update:
Check the front end visually. Load your homepage and two or three internal pages. Look for layout breaks, missing elements, or error messages appearing on the page.
Check the admin dashboard. Log out and log back in. Navigate through the key admin areas. A plugin conflict often manifests as a broken or missing admin menu rather than a front-end error.
Open the browser developer console. Press F12 in Chrome or Firefox and click the Console tab. Red error messages here indicate JavaScript conflicts — a common symptom of plugin updates that load scripts conflicting with existing ones.
Test your critical conversion points. If you run a WooCommerce store, complete a test purchase. If your site has a contact form, submit it and confirm the notification arrives. If you have a booking system, complete a test booking. These are the functions where a broken plugin costs you real money — catch it in testing, not in your revenue data.
Check your server error log. If you have WP_DEBUG enabled and logging to a file, check wp-content/debug.log for any new PHP errors. Silent errors that do not display on the page can still indicate a problem developing beneath the surface.
Step 5: What to Do If an Update Breaks Something
If an update produces a visible error or breaks functionality, the immediate priority is restoring the site — not diagnosing the cause. Restore first, investigate second.
If the admin dashboard is still accessible, deactivate the plugin you just updated. If the site recovers, you have confirmed the plugin is the cause. You can then either roll back to the previous version using a plugin like WP Rollback, or restore from your pre-update backup.
If the dashboard is inaccessible — which can happen with a PHP fatal error — deactivate the plugin via FTP by renaming its folder in wp-content/plugins/. Navigate to your FTP root, find the plugins directory, and rename the problematic plugin’s folder (for example, rename plugin-name to plugin-name-disabled). WordPress will no longer load it, and the site should recover.
If neither approach resolves it, restore from your pre-update backup. This is the scenario where having a current backup is the difference between a five-minute recovery and a multi-hour rebuild.
Once the site is restored, report the conflict to the plugin developer — most maintain a support forum on WordPress.org or a dedicated support portal for premium plugins. A good developer will acknowledge the issue and release a fix. In the meantime, if you are dealing with a plugin conflict that requires deeper diagnosis, working through the conflict isolation process will identify exactly which combination of plugins is causing the issue.
Managing WordPress Auto-Updates
WordPress introduced automatic background updates for minor core versions, and subsequent releases extended this to allow auto-updates for plugins and themes. Used thoughtfully, auto-updates can keep your site secure without requiring manual attention for every patch release. Used carelessly, they can update a plugin on a live site overnight and leave you with a broken site in the morning.

The WordPress auto-update system can be controlled at three levels: per-plugin from the dashboard (introduced in WordPress 5.5), via filters in your theme’s functions.php file, or through a plugin like Easy Updates Manager which provides a complete interface for managing auto-update settings across all plugins, themes, and core versions.
The appropriate auto-update strategy for most sites:
Enable auto-updates for WordPress core minor versions. Security patches released between major versions (for example, 6.4.1 to 6.4.2) are designed to be safe to apply immediately and rarely cause compatibility issues. Keeping these current automatically is the right choice for nearly every site.
Consider auto-updates for simple, low-dependency plugins. A plugin that does one specific thing — redirecting URLs, generating sitemaps, optimising images — with minimal interaction with other plugins is a reasonable candidate for auto-updates. The conflict risk is low and the security benefit is real.
Keep auto-updates off for complex or premium plugins. WooCommerce, page builders, membership plugins, and any paid premium plugin should be updated manually after testing. These are the plugins most likely to introduce breaking changes in major updates, and they are also the plugins most critical to your site’s core functionality.
Whatever your auto-update strategy, configure email notifications for automatic updates. WordPress can send an email when an automatic update completes — whether successfully or with an error. This ensures you always know what has changed on your site, even when you did not initiate the change.
Building a Sustainable Plugin Update Workflow
The most effective approach to plugin updates is to make them a scheduled, structured routine rather than something that happens reactively when WordPress displays a red notification badge.
A weekly update session — scheduled at a consistent time, documented in a simple checklist — transforms plugin maintenance from a source of anxiety into a predictable, manageable task. The session should follow the same sequence every time: check for updates, read relevant changelogs, back up, update staging, test on staging, deploy to live, verify on live. For a typical site with ten to fifteen active plugins, this takes thirty to forty-five minutes per week.
For sites where uptime and security are business-critical — ecommerce stores, membership sites, high-traffic content sites — the managed technical support service at Matrix Internet covers ongoing plugin maintenance, security monitoring, and update management as part of a structured site care plan. Updates are tested on staging, applied with backups in place, and verified before the session closes — so the site owner never needs to think about it.
Plugins You Should Never Update Without Extra Care
Certain plugins warrant elevated caution regardless of your general update process, because a breaking change in them affects nearly every aspect of the site:
WooCommerce — major WooCommerce updates frequently include database schema changes and API modifications that can affect every extension, theme, and custom code interacting with it. Always update WooCommerce and its official extensions together, after testing on staging, and ideally during a low-traffic window.
Page builders — Elementor, Divi, Beaver Builder, and similar page builders interact with virtually every post and page on the site. A breaking update can affect the visual output of hundreds of pages simultaneously. Major version updates to page builders require staging testing without exception.
Security plugins — Wordfence, Sucuri, iThemes Security, and similar tools run at the server level and interact directly with your .htaccess file and WordPress configuration. Updates that change firewall rules or configuration can occasionally lock you out of the admin dashboard if something goes wrong.
Caching plugins — W3 Total Cache, WP Super Cache, WP Rocket, and LiteSpeed Cache interact with your server configuration and can conflict with hosting-level caching. After updating a caching plugin, always clear all caches and test thoroughly before confirming the update is stable.
Summary
Updating WordPress plugins safely is not complicated — it is disciplined. Back up before every update session. Read changelogs before major version bumps. Test on staging before deploying to live. Update one plugin at a time and verify after each. Know how to roll back quickly if something breaks. Manage auto-updates thoughtfully rather than leaving them on or off wholesale.
The investment in a structured update process is measured in minutes per week. The cost of skipping it — a security breach, a broken checkout, an extended downtime event — is measured in hours of recovery time, lost revenue, and damaged customer trust. The discipline is worth it every time.
If you want expert support managing your WordPress site’s maintenance, updates, and security monitoring, the technical support team at Matrix Internet provides ongoing site care that keeps your WordPress installation secure, current, and performing — without you needing to think about it.
At Matrix Internet, our technical support team handles WordPress plugin updates, maintenance, and security monitoring on your behalf — so your site stays current, conflict-free, and protected without you having to manage it yourself.
FAQs
Using "Update All" is the most common plugin update mistake site owners make. When you update multiple plugins simultaneously and something breaks, you have no way of knowing which update caused the problem — because several things changed at once. The correct approach is to update one plugin at a time, reload and check the site after each update, and only proceed to the next once you have confirmed everything is working. This takes a little longer but saves significant diagnostic time if an issue appears.
For most sites, a weekly update session is the right cadence. This keeps plugins current enough that security vulnerabilities are patched promptly, without the pressure of rushing through updates reactively. For security-specific patches — where a plugin developer has disclosed a vulnerability and released a fix — update as soon as possible regardless of your regular schedule, as the window between disclosure and active exploitation can be very short. Utility plugins with low conflict risk can be set to auto-update, while complex plugins like WooCommerce and page builders should always be updated manually after testing.
First, do not panic — if you took a backup before updating, you have a clean restore point. If the admin dashboard is still accessible, deactivate the plugin you just updated and the site should recover. If the dashboard itself is inaccessible, connect via FTP and rename the plugin's folder inside wp-content/plugins/ — WordPress will no longer load it and the site will come back. Once the site is restored, use the WP Rollback plugin to revert to the previous version while you report the issue to the plugin developer and wait for a fix. If neither approach works, restore from your pre-update backup.
For simple sites with low traffic and no ecommerce or booking functionality, updating directly on live — carefully, one at a time, with a backup in place — is a manageable risk. For any site where downtime has a direct business cost, a staging environment is not optional. A staging site lets you test every update in an identical environment before it touches your live site, which means any compatibility issue or conflict is caught in private rather than in front of your visitors. Most managed hosting providers include one-click staging, and the WP Staging plugin can create a local clone if your host does not provide one.
By Srdjan


