

BLOG
Setting Up a Professional Email with Your Domain: A Complete Guide
4 min read
Matrix is proud to join PACE, now launched in Moldova. The Erasmus+ project strengthens youth organisations across the region with training, digital resources and collaboration to support displaced Ukrainian young people.
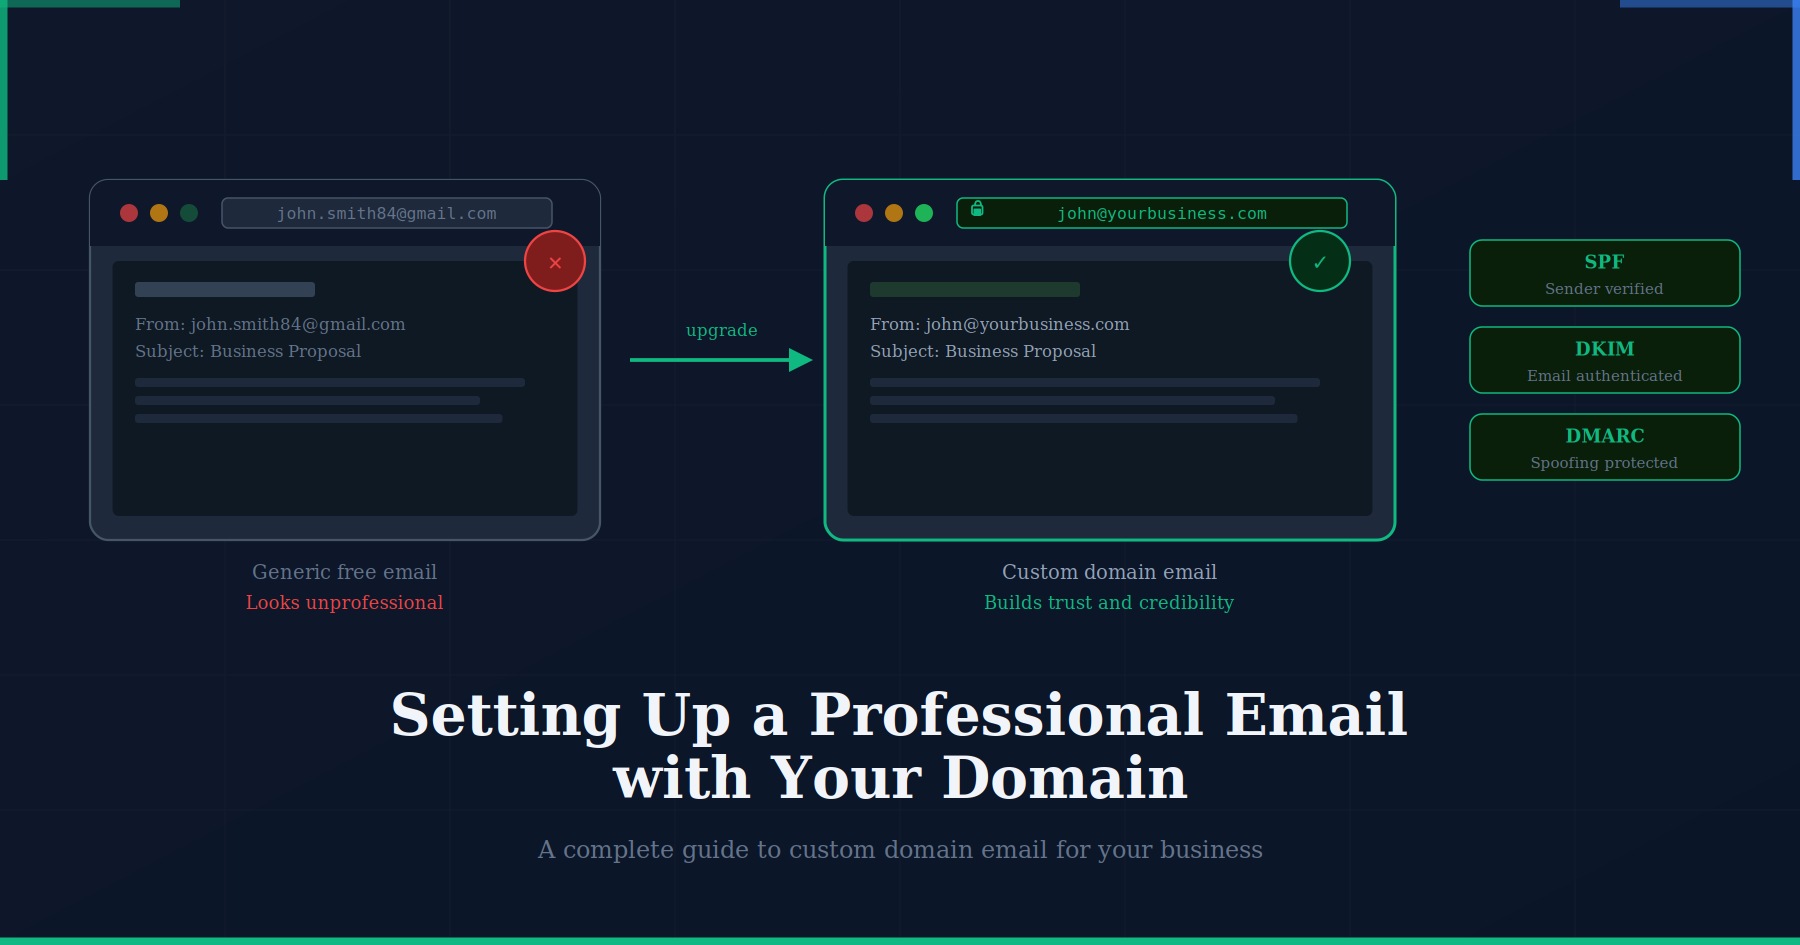
Using a Gmail or Hotmail address for your business sends a message — just not the one you intend. It tells potential clients and partners that you have not yet invested in the basics of professional infrastructure. A custom domain email address — you@yourbusiness.com rather than yourbusiness84@gmail.com — costs very little to set up, but the trust and credibility it builds with every email you send is disproportionately valuable.
This guide covers everything you need: what a custom domain email is, which provider to choose, how to set it up from start to finish, how to configure the DNS records that determine whether your emails land in inboxes or spam folders, and how to manage your email setup as your business grows.
What Is a Custom Domain Email Address?
A custom domain email address uses your own domain name — the web address you own, such as yourbusiness.com — as the part after the @ symbol. Instead of john@gmail.com, your email becomes john@yourbusiness.com.
This is different from simply forwarding an email to a Gmail address. With a proper custom domain email setup, your email is hosted on a dedicated email server (provided by your email host), you send and receive from your own domain, and every piece of communication reinforces your brand rather than someone else’s.
You need two things to set this up: a domain name you own, and an email hosting service. Your domain registrar (where you bought your domain) and your email host are often different companies, though some hosts provide both.
Why It Matters More Than You Think
The professional credibility argument is obvious, but there are practical reasons beyond appearances that make custom domain email worth prioritising.
Deliverability. Emails sent from free consumer email services to business contacts are more likely to be filtered as spam or promotional, particularly in B2B contexts. A properly configured custom domain email with correct DNS records — SPF, DKIM, and DMARC, covered below — achieves significantly better inbox placement rates.
Brand consistency. Every email you send is an opportunity to reinforce your domain and brand name. Clients who see john@yourbusiness.com in their inbox are also seeing yourbusiness.com — your website — in their peripheral awareness every time.
Ownership and portability. A Gmail address belongs to Google. If your account is locked or terminated for any reason, you lose access to years of business communication and contacts. A custom domain email address is yours — you can move it to a different email host at any time without losing your address.
Team scalability. As your business grows, you can add team members with addresses like sarah@yourbusiness.com or role-based addresses like support@yourbusiness.com and billing@yourbusiness.com, all managed from a single admin panel.
Step 1: Choose Your Email Provider
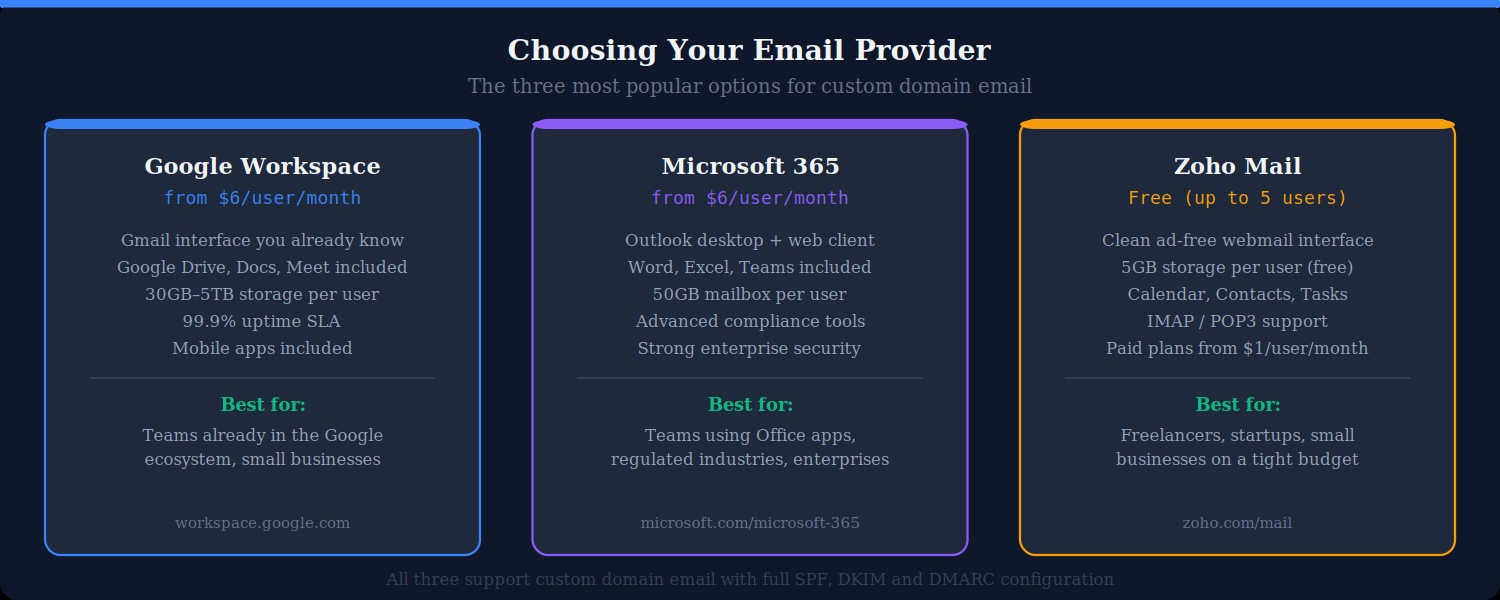
Your email host is the company whose servers store and transmit your email. There are three mainstream choices, each suited to different needs and budgets.
Google Workspace
Google Workspace (formerly G Suite) gives you a Gmail-powered inbox at your own domain, combined with Google Drive, Google Docs, Google Meet, and the rest of Google’s productivity suite. The interface is identical to personal Gmail, which means virtually no learning curve for most users. Plans start at around $6 per user per month for the Business Starter tier, which includes 30GB of storage per user and a 99.9% uptime SLA.
Google Workspace is the most popular choice for small to medium businesses, particularly those already embedded in Google’s ecosystem. If your team already uses Google Drive and Google Docs, the integration is seamless. Setup takes approximately 30 minutes once your domain’s DNS settings are accessible.
Microsoft 365
Microsoft 365 Business Basic starts at a similar price point to Google Workspace and provides Outlook as your email client — available as a desktop application, a web client, and a mobile app — along with Microsoft Teams, SharePoint, and 50GB of mailbox storage per user. For teams that rely on Microsoft Office applications or operate in industries with strict compliance requirements, Microsoft 365’s enterprise-grade security and compliance tooling is a significant advantage.
The setup process is slightly more involved than Google Workspace but well-documented, and Microsoft provides a step-by-step domain verification and DNS configuration wizard within the admin portal.
Zoho Mail
Zoho Mail offers a free plan for up to five users with 5GB of storage each — making it the most accessible entry point for freelancers, sole traders, and very small businesses on a tight budget. The interface is clean and ad-free. Paid plans start at approximately $1 per user per month for additional storage and features. Zoho Mail supports full SPF, DKIM, and DMARC configuration, IMAP and POP3 access, and includes a calendar, contacts, and task manager.
Zoho Mail is an excellent choice if cost is the primary consideration and your email volumes and team size are small. It lacks the deep integration with other productivity tools that Google Workspace and Microsoft 365 offer, but as a standalone email solution it is reliable and professional.
Email hosted by your web host
Many web hosting providers — SiteGround, cPanel-based hosts, and others — include email hosting with your hosting plan. This can seem convenient since everything is in one place, but it comes with significant drawbacks: shared server resources mean email deliverability can be affected by other accounts on the same server, there is typically no dedicated mobile app, storage is often limited, and the webmail interfaces (Roundcube, Horde) are significantly less polished than Gmail or Outlook. For anything beyond personal hobby sites, a dedicated email provider is strongly recommended.
Step 2: Sign Up and Verify Your Domain
Once you have chosen your email provider, sign up for an account. During the setup process, you will be asked to verify that you own the domain you want to use for email. This is a standard security step — without it, anyone could set up an email server claiming to be your domain.
Domain verification is done by adding a TXT record to your domain’s DNS settings. Your email provider will display a specific TXT record value — a string of characters unique to your account. You need to add this to your domain’s DNS in your domain registrar’s dashboard.
Here is how to add the verification record:
- Log into your domain registrar (GoDaddy, Namecheap, Cloudflare, or wherever you purchased your domain)
- Find the DNS management section — usually labelled “DNS Settings”, “Manage DNS”, or “Zone Editor”
- Create a new TXT record, set the Name/Host field to
@(which means the root domain), and paste the verification code from your email provider into the Value field - Save the record and return to your email provider’s setup wizard
- Click “Verify” — it may take a few minutes to propagate before verification succeeds
Once your domain is verified, the email provider knows you legitimately own it and allows you to proceed with full configuration.
Step 3: Configure Your MX Records
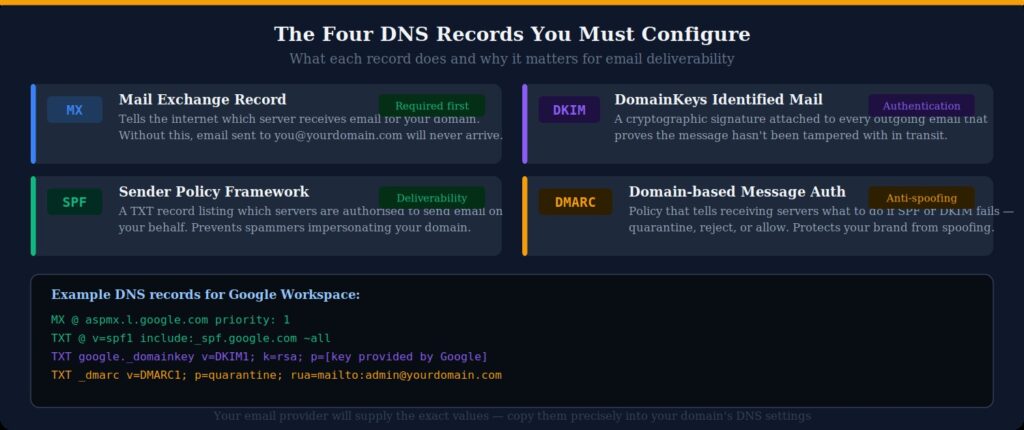
MX (Mail Exchange) records are the DNS entries that tell the internet’s mail infrastructure which server to deliver email to when someone sends a message to your domain. Without MX records pointing to your email provider’s servers, email sent to your address will simply not be delivered — it will bounce back to the sender with a “no such host” error.
Your email provider will supply specific MX record values during setup. For Google Workspace, the primary record points to aspmx.l.google.com. For Microsoft 365, it points to a .mail.protection.outlook.com address unique to your tenant. Copy these values exactly — MX records are case-insensitive but must be precisely correct.
In your domain registrar’s DNS settings:
- Delete any existing MX records pointing to your web host (if applicable — if you previously used hosting-based email, those records need to be replaced)
- Add the new MX record(s) provided by your email provider
- Set the priority value as specified — a priority of 1 or 10 is typical for the primary record; some providers supply secondary records with higher priority numbers for redundancy
- Save the records
DNS changes can take up to 48 hours to fully propagate across the internet, though most updates resolve within 1–4 hours. During propagation, email may be intermittently delivered to both old and new servers. Avoid making MX record changes during busy business periods where possible.
Step 4: Configure SPF, DKIM, and DMARC
These three DNS records are the authentication layer of your email setup. They are not strictly required for email to function, but without them your emails are significantly more likely to land in spam folders — particularly when emailing corporate recipients who use Microsoft 365 or Google Workspace with strict filtering. Setting all three up takes about fifteen minutes and has a measurable positive impact on email deliverability.
SPF (Sender Policy Framework)
An SPF record is a TXT record added to your domain’s DNS that lists which mail servers are authorised to send email from your domain. When a receiving mail server gets an email claiming to be from you@yourbusiness.com, it checks the SPF record for your domain and confirms that the sending server is on the approved list. If it is not, the email may be marked as spam or rejected.
Your email provider will supply the exact SPF record value. For Google Workspace it looks like:
v=spf1 include:_spf.google.com ~allAdd this as a TXT record with the Name/Host set to @. If you already have an SPF record (some domain registrars add one by default), do not create a second one — instead edit the existing record to include your email provider’s include statement. Only one SPF record per domain is permitted.
DKIM (DomainKeys Identified Mail)
DKIM adds a cryptographic digital signature to every outgoing email. The signature is generated using a private key held by your email provider and verified by recipients using a public key published in your DNS. This proves two things: that the email genuinely came from a server authorised by your domain, and that the email content has not been altered in transit.
To set up DKIM, you first need to enable it in your email provider’s admin console. Google Workspace and Microsoft 365 both have a DKIM section in their admin settings where you generate a key pair. The admin console will display a TXT record — typically with a host name like google._domainkey.yourdomain.com — that you add to your DNS. Once the DNS record propagates, return to the admin console and activate DKIM signing.
DMARC (Domain-based Message Authentication, Reporting and Conformance)
DMARC is a policy record that instructs receiving mail servers on what to do when an email claiming to be from your domain fails SPF or DKIM checks. The three policy options are none (monitor only, take no action), quarantine (deliver to spam folder), and reject (refuse delivery entirely).
A basic starter DMARC record looks like this:
v=DMARC1; p=none; rua=mailto:admin@yourbusiness.comAdd this as a TXT record with the host set to _dmarc. Starting with p=none allows you to receive DMARC reports without blocking any email — useful for a few weeks while you confirm that your legitimate email is passing SPF and DKIM checks before tightening the policy to quarantine or reject.
The rua parameter specifies an email address to receive aggregate DMARC reports, which show you how your domain is being used for email and whether any unauthorised senders are attempting to spoof it.
Step 5: Create Your Email Addresses
With your domain verified and DNS records in place, you can now create the actual email addresses your team will use. Log into your email provider’s admin console and navigate to the users section to add new accounts.
Naming conventions
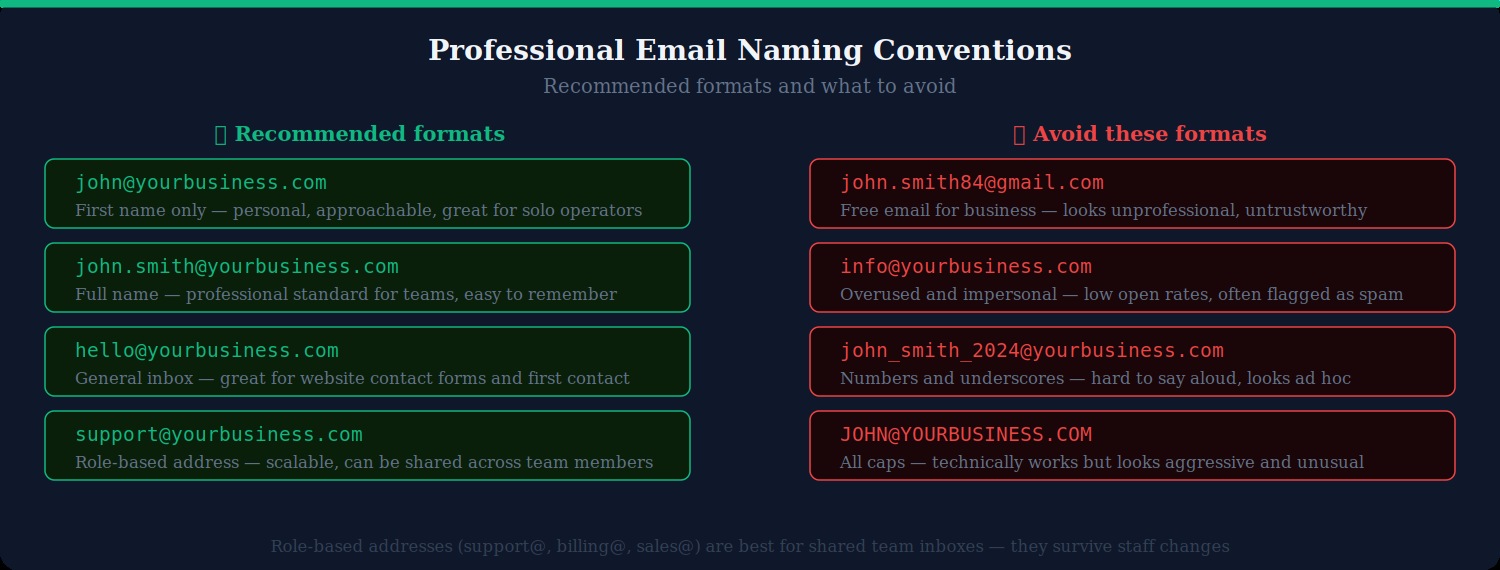
The most professional and widely used format is firstname@yourdomain.com or firstname.lastname@yourdomain.com. First name only is appropriate for small teams where first names are unique; first name and last name becomes necessary as teams grow. Both are easy to say aloud, easy to remember, and convey a personal, professional image.
Role-based addresses — hello@, support@, sales@, billing@, admin@ — serve a different purpose. They are not tied to a specific individual, which means they survive staff changes without requiring clients to update their records. They can be shared between multiple team members or routed to a shared inbox. Use role-based addresses for your public-facing contact points and personal addresses for individual team communication.
Avoid using info@ as your primary contact address. It is so overused that many email clients and spam filters treat it with lower priority. hello@ or contact@ are friendlier and achieve better open rates.
Aliases
Most email providers allow you to create aliases — additional email addresses that deliver to an existing inbox without requiring a separate account. For example, you might create hello@yourbusiness.com as an alias that forwards to your primary john@yourbusiness.com inbox. Aliases are included in most plans at no extra cost and allow you to manage multiple addresses without paying for multiple user accounts.
Step 6: Set Up Email Clients and Mobile Access
Once your email addresses are created, you need to configure how you access them. You have two main options: use your email provider’s webmail interface directly in a browser, or connect a dedicated email client.
Webmail
Both Google Workspace (Gmail) and Microsoft 365 (Outlook Web) provide full-featured browser-based email clients that work well for daily use. Zoho Mail’s webmail interface is similarly capable. For most users, webmail is sufficient and requires no additional setup — log in and start using it.
Desktop clients
If you prefer a desktop application, Microsoft Outlook, Apple Mail, Mozilla Thunderbird, and others all support custom domain email via IMAP or — if provided by your email host — native protocol connectors. Your email provider’s documentation will include specific IMAP/SMTP server settings. IMAP is strongly preferred over POP3, as it syncs your email across all devices rather than downloading it to a single machine.
Mobile apps
Google Workspace users can access their custom domain email through the standard Gmail app on iOS and Android by adding the account in settings. Microsoft 365 users can use the Outlook mobile app. Both allow you to send from your custom domain address from your phone, keeping the professional appearance consistent across all devices.
Step 7: Test Your Setup
Before relying on your new email setup for important business communication, run through a quick verification checklist:
- Send a test email to yourself from a personal Gmail or Outlook account and confirm it arrives in your new inbox
- Reply from your new address and confirm the reply arrives correctly with your custom domain showing in the From field
- Check your SPF record using a free tool like MXToolbox (mxtoolbox.com/spf.aspx) — it will confirm the record is correctly formatted and resolving
- Check your DKIM record using MXToolbox’s DKIM lookup — enter your selector (usually “google” for Google Workspace or “selector1” for Microsoft 365) and your domain
- Run a mail deliverability test using mail-tester.com — send an email to the address provided and it will score your email configuration out of 10, flagging any deliverability issues
- Check that email sent to old addresses forwards correctly if you have set up any forwarding from previous accounts
A perfect or near-perfect mail-tester.com score confirms that your SPF, DKIM, and DMARC are correctly configured and your email is well-positioned to land in inboxes rather than spam folders.
Common Setup Issues and How to Fix Them
Emails are going to spam
If test emails are landing in the recipient’s spam folder, the most common causes are a missing or incorrect SPF record, DKIM not yet enabled, or a sending reputation issue with your new domain (new domains have no sending history, which can trigger spam filters initially). Ensure all three DNS records are correctly configured, and gradually increase your sending volume over the first few weeks rather than sending high volumes immediately.
Cannot send email — authentication error
If your desktop email client cannot connect to send email, verify that you are using the correct SMTP server address, port (usually 587 with STARTTLS or 465 with SSL/TLS), and that you are authenticating with your full email address rather than just the username portion. Google Workspace requires an App Password if you have two-factor authentication enabled on your account.
DNS changes are not taking effect
DNS propagation can take up to 48 hours. If the records you have added are not yet being detected by verification tools, wait a few hours and check again. You can check propagation status across global DNS servers at dnschecker.org — search for your domain and record type to see which servers have picked up the change.
MX records are conflicting with the old hosting email
If you previously used email hosting provided by your web host, you will have existing MX records pointing to their servers. You must delete those old MX records and replace them entirely with your new provider’s MX records. Having two sets of MX records with equal priority will cause some email to be delivered to the old server and some to the new one, effectively splitting your inbox.
Migrating Existing Email to Your New Setup
If you have been using a Gmail or other free email account for your business and have a history of important emails you want to retain, both Google Workspace and Microsoft 365 provide migration tools that import your existing email history into your new custom domain inbox.
Google Workspace includes a Data Migration Service in the admin console that can import email from Gmail, Microsoft Exchange, or any IMAP-accessible account. Microsoft 365 similarly provides migration tooling through its admin portal. For most small businesses, the migration process takes a few hours and requires no technical expertise beyond following the wizard.
Even if you do not formally migrate, keeping your old Gmail or Outlook account accessible as an archive while transitioning to your custom domain address is straightforward — simply set up forwarding from the old account to the new one during the transition period.
Summary
Setting up a professional email address at your own domain is one of the highest-return investments you can make in your business’s credibility. The process involves four core steps: choose an email provider suited to your size and budget, verify your domain, configure your MX records so email is correctly routed, and set up SPF, DKIM, and DMARC to ensure your email lands in inboxes rather than spam folders. Most setups are complete within an hour once you have access to your domain’s DNS settings.
The moment you start sending from you@yourbusiness.com rather than a free consumer email service, the perception of your business changes — in every inbox your emails reach.
At Matrix Internet, our technical support team helps businesses find and fix broken links quickly — auditing your site, setting up the right redirects, and putting monitoring in place to stop dead links from damaging your SEO and user experience.
FAQs
No — you use a domain you already own. If you have a website at yourbusiness.com, you can set up email at that same domain. If you do not yet have a domain, you can register one through any domain registrar such as Namecheap, GoDaddy, or Cloudflare for around $10–15 per year, then connect it to your chosen email provider. The domain and the email hosting are two separate things purchased independently.
A free Gmail account gives you a @gmail.com address and is intended for personal use. Google Workspace is a paid business service that lets you use Gmail's interface and infrastructure with your own domain — so your address becomes you@yourbusiness.com instead of you@gmail.com. Google Workspace also includes business-grade admin controls, user management, higher storage limits, a service level agreement guaranteeing 99.9% uptime, and Google Drive, Docs, Meet, and Calendar integrated across your team.
Your email address stays the same as long as you keep your domain. Switching providers simply means updating your MX records to point to the new provider's servers — the address itself does not change. Most major providers including Google Workspace and Microsoft 365 offer migration tools that import your existing email history into the new inbox, so you do not lose any previous correspondence. This is one of the key advantages of owning your domain: you are never locked into a specific provider.
The most common cause is missing or incorrectly configured authentication records — specifically SPF, DKIM, or DMARC. Without these DNS records, receiving mail servers cannot verify that your emails are legitimate, and spam filters will treat them with suspicion. Run a free test at mail-tester.com by sending an email to the address provided — it will score your configuration and show exactly which records are missing or misconfigured. New domains also have no sending history, so building that reputation gradually over the first few weeks by sending to engaged recipients helps establish deliverability.
This depends entirely on your email provider and plan. Google Workspace and Microsoft 365 charge per user, so each person who needs their own inbox requires a paid licence — typically $6 per user per month on entry-level plans. However, you can create unlimited aliases on each account at no extra cost, so one paid user can receive email at multiple addresses. Zoho Mail's free plan allows up to five users with individual inboxes. Role-based addresses like support@ or billing@ can be set up as shared inboxes or aliases and do not necessarily require a separate paid user account.
By Matrix Internet


