

BLOG
Managing User Roles and Permissions in WordPress: The Complete Guide
4 min read
Matrix is proud to join PACE, now launched in Moldova. The Erasmus+ project strengthens youth organisations across the region with training, digital resources and collaboration to support displaced Ukrainian young people.
One of the most overlooked security risks on any WordPress site is not a vulnerability in the code — it is the people who have access to it. An ex-employee who still has an active admin account. A freelance writer was given administrator privileges because it was easier than figuring out the correct role. A developer who was handed the main admin login credentials and is still using them years later. These are not hypothetical scenarios. They are the norm on sites that have never given user roles and permissions serious attention.
WordPress has a well-designed user role system that, when used correctly, ensures every person who touches your site has exactly the access they need — and nothing more. Understanding how it works, assigning roles deliberately, and auditing access regularly are three of the simplest and most effective things you can do to improve your site’s security and operational clarity.
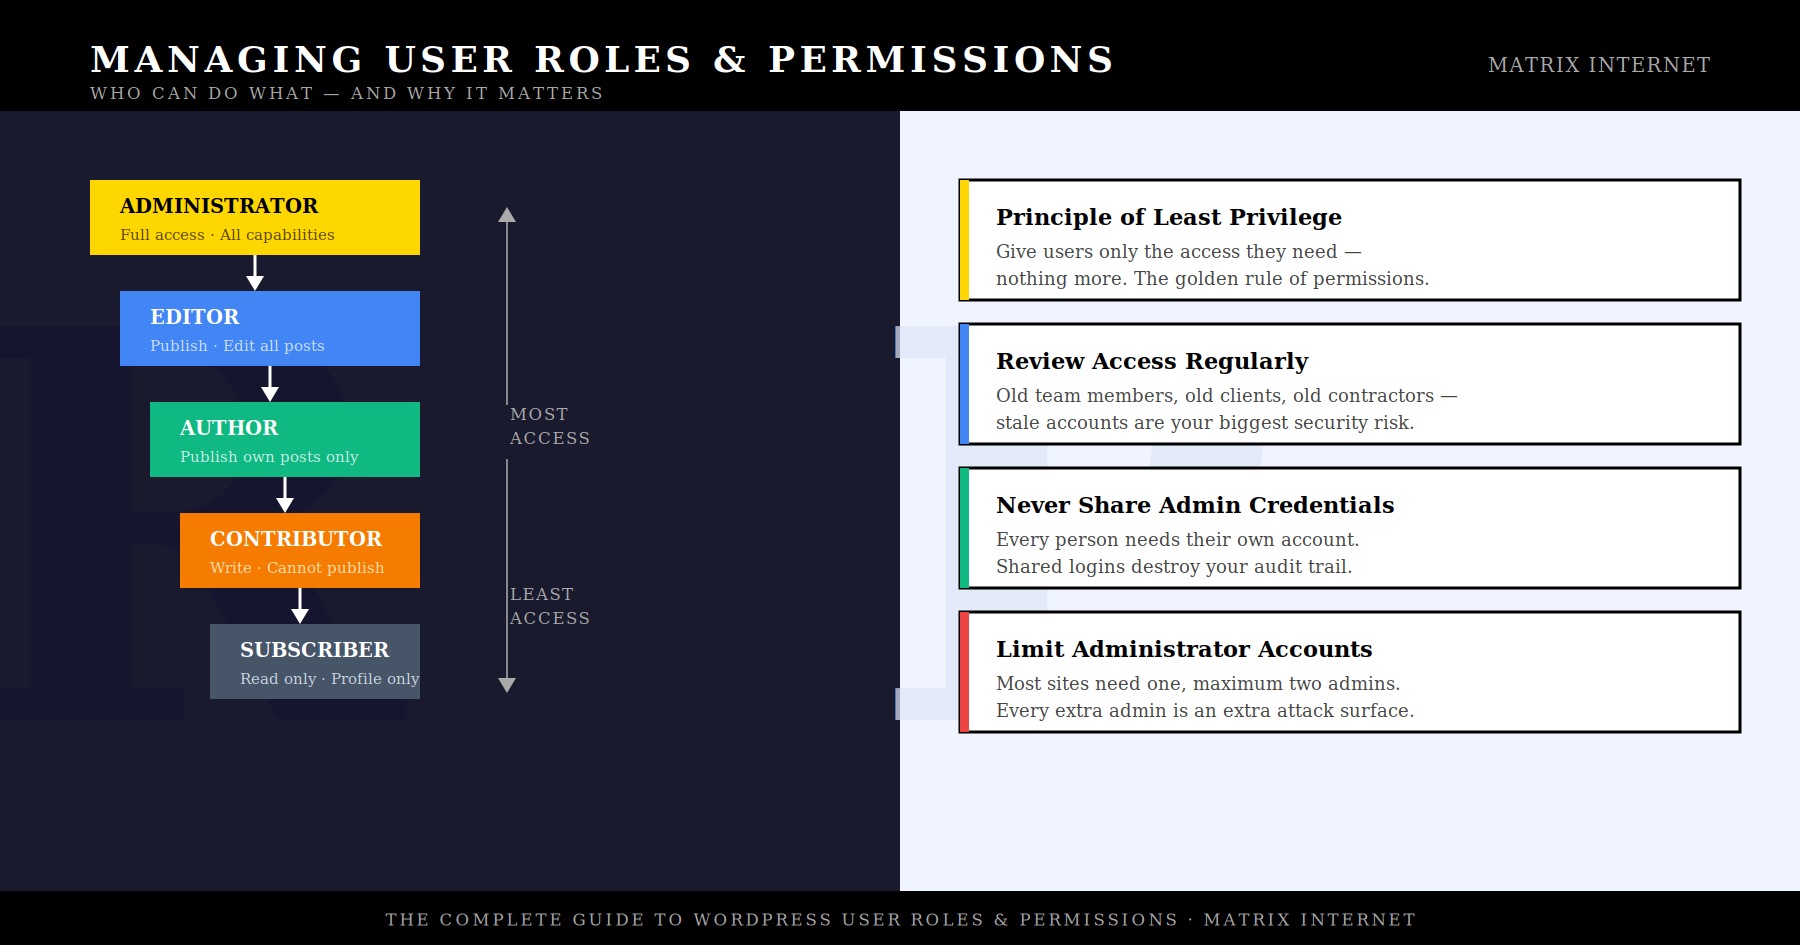
The Five Default WordPress User Roles
WordPress ships with five built-in user roles, arranged in a hierarchy from maximum to minimum access. Each role is defined by a set of capabilities — granular permissions that determine what a user can see, create, edit, publish, and delete within the WordPress dashboard.
Administrator
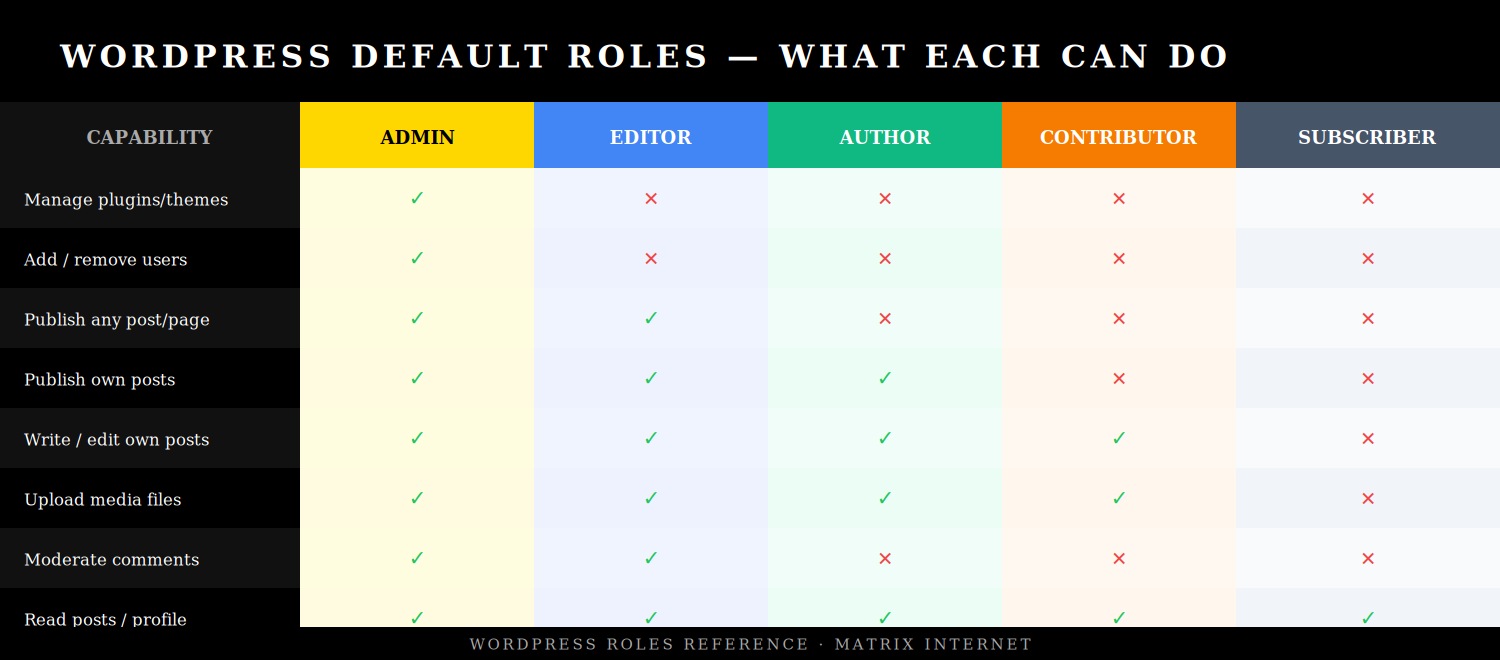
The Administrator role has unrestricted access to everything on the site. Administrators can install and delete plugins and themes, add and remove users, change site settings, edit any content regardless of author, access the WordPress database settings, and in some configurations, edit PHP files directly from the dashboard. On a standard WordPress installation, there is effectively nothing an Administrator cannot do.
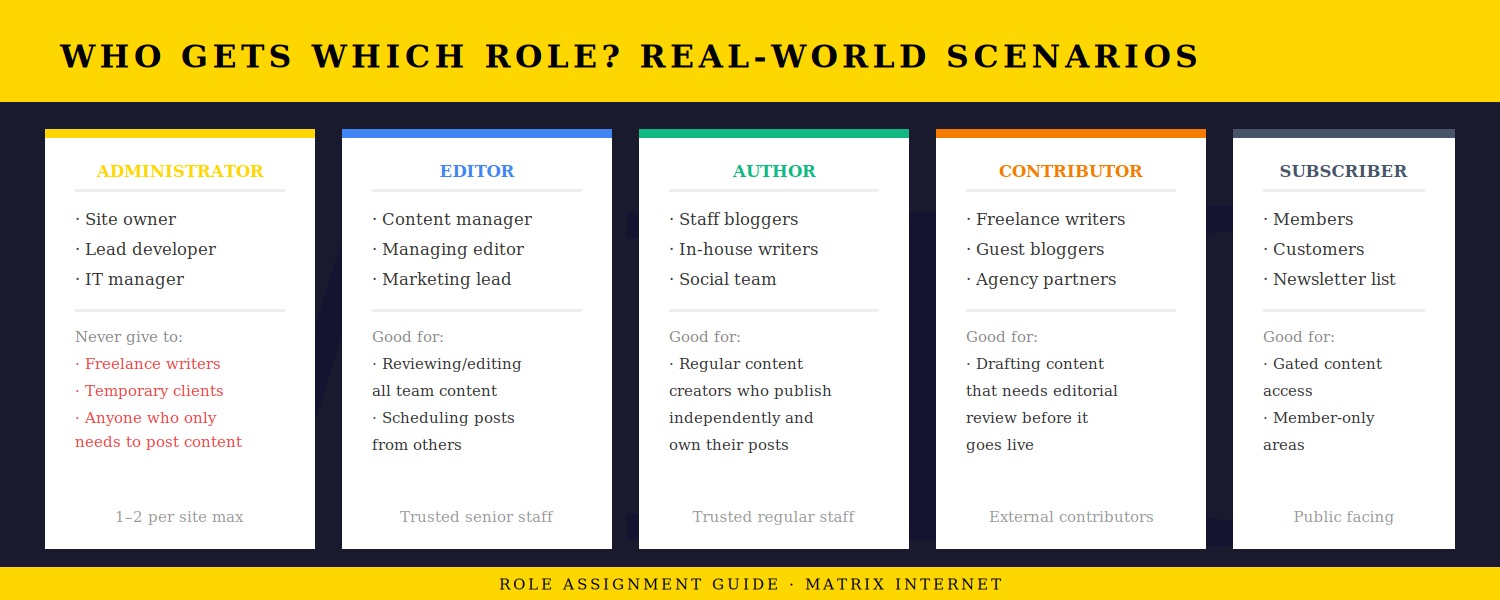
Because of this, Administrator access should be treated like a master key — issued to as few people as possible, only to those who genuinely require it, and reviewed regularly. For most sites, one or two Administrator accounts is the appropriate number. A content writer does not need Administrator access. An SEO consultant does not need Administrator access. A social media manager does not need Administrator access. Assign administrator access when it is genuinely required, not as a default for anyone who asks.
Editor
The Editor role has broad content management capabilities. Editors can publish, edit, and delete posts and pages — including content written by other users. They can manage categories and tags, moderate comments, and upload media files. What they cannot do is change site settings, install plugins or themes, or manage user accounts.
Editor is the right role for a content manager, managing editor, or marketing team lead who needs to oversee and publish content across the site without requiring access to its technical infrastructure. It is a powerful role and should be assigned to trusted, permanent team members rather than contractors or temporary staff.
Author
Authors can write, edit, publish, and delete their own posts, and upload media files. They cannot edit or publish posts written by other users, and they have no access to settings, plugins, themes, or user management. Their world within WordPress is limited to their own content.
Author is typically the correct role for regular staff writers, in-house content creators, and team members who produce their own content independently and do not need oversight or editing of other people’s work.
Contributor
The Contributor role is a restricted version of Author. Contributors can write and edit their own posts but cannot publish them — they submit drafts that must be reviewed and published by an Editor or Administrator. Critically, Contributors also cannot upload media files, which means any images in their posts need to be added by someone with higher permissions.
Contributor is the appropriate role for freelance writers, guest bloggers, and external contributors — people who produce content for the site but whose work should go through an editorial review process before it appears publicly. It is a useful trust boundary that keeps the publishing workflow under your control even when external parties are creating content.
Subscriber
Subscribers have the most limited access of any WordPress user role. They can log in, read published content, and manage their own profile. That is all. They cannot create or edit any posts, access any dashboard settings, or see any administrative areas of the site.
Subscriber is primarily used on sites with membership functionality — where registered users get access to gated content, member-only areas, or personalised experiences. It is also the default role assigned when new users register on a site that allows public registration, which makes it important to ensure your default registration role is set correctly in Settings → General.
Choosing the Right Role for Each Person
The principle that should guide every role assignment decision is the principle of least privilege: give each user the minimum level of access required to perform their specific tasks, and no more. This principle is a cornerstone of cybersecurity best practice and applies to systems far beyond WordPress — but it is particularly easy to apply here because the role structure does most of the thinking for you.
In practice, the most common role assignment mistakes are:
Assigning Administrator when Editor would suffice. This happens most often when an administrator is in a hurry and chooses the highest role rather than thinking through what the person actually needs. An Editor can manage all content on the site — most content-related tasks do not require Administrator access.
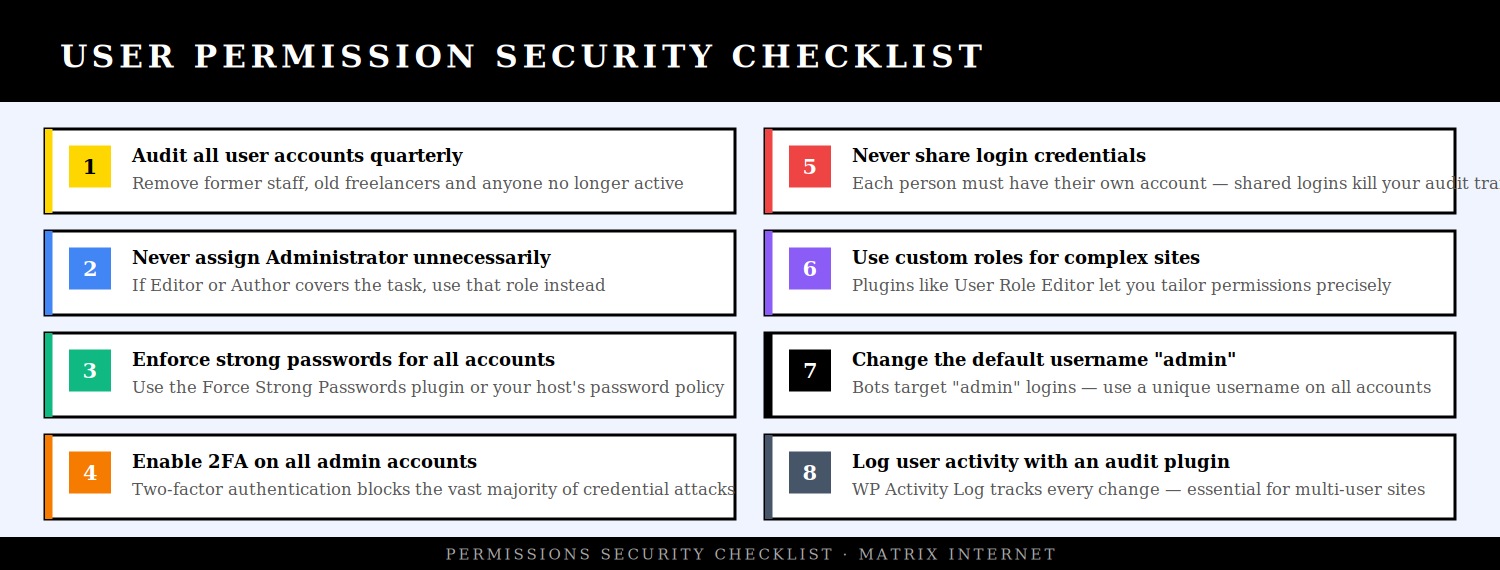
Using a shared Administrator account. Sharing a single admin login between multiple team members is a common shortcut that creates serious problems. It eliminates your audit trail — you cannot tell who made a change, deleted a post, or altered a setting. It means that when one person leaves the team, changing the password disrupts everyone else. And it means a single credential compromise affects every person using that account simultaneously. Every individual needs their own account.
Not removing access when someone leaves. This is arguably the most dangerous common mistake. A former employee with an active Administrator account is an open door. Even if the separation was amicable, that person’s credentials may be stored in a password manager, written down, or subsequently compromised in an unrelated data breach — and they will still work on your site months or years later if the account has not been removed.
How to Add and Manage Users in WordPress
Adding a new user to WordPress is straightforward. Navigate to Users → Add New in your WordPress dashboard. You will need to provide a username — which cannot be changed after creation — an email address, and optionally a first and last name. WordPress will generate a strong password automatically, which you can copy and share with the new user, or you can allow WordPress to send them a welcome email with login instructions.
The most important field on this screen is the Role dropdown. Think before you select — once a role is assigned, it can be changed later, but the habit of defaulting to a high role creates security debt that accumulates over time.
To change an existing user’s role, go to Users → All Users, hover over the user’s name, and click Edit. The Role field appears in the Name section of the user profile. You can also bulk-change roles by checking multiple users on the All Users screen and using the Change Role dropdown above the list.
To delete a user, hover over their name in the All Users list and click Delete. WordPress will ask you what to do with the content that user authored — you can reassign it to another user or delete it entirely. Always reassign content rather than deleting it, unless you are certain the content is no longer needed.
Creating Custom User Roles
WordPress’s five default roles cover most use cases, but there are situations where none of them quite fit. A client who needs to see analytics but not edit content. A shop manager who needs to process WooCommerce orders but should not touch blog posts. A translator who needs access to specific pages but nothing else.
For these situations, custom roles and granular capability management are the answer. The most widely used plugin for this is User Role Editor (free, 700,000+ active installations), which provides a visual interface for creating new roles, modifying existing ones, and assigning or removing individual capabilities from any role. You can build a custom role from scratch, duplicate an existing role and adjust it, or directly edit which capabilities each default role has.
Other plugins worth knowing:
Members — a comprehensive role and capability manager that also integrates with content restriction functionality, allowing you to restrict access to specific posts or pages based on role.
Capability Manager Enhanced — particularly strong for plugin-specific capabilities, useful when third-party plugins add their own permissions that you want to assign selectively.
WooCommerce adds its own roles (Shop Manager and Customer) when installed, which is worth knowing if you run an e-commerce site — the Shop Manager role gives broad access to orders, products, and reports without full Administrator permissions.
Multisite and Network-Level Roles
If you run a WordPress Multisite network — multiple sites managed under a single WordPress installation — there is an additional role tier above Administrator: the Super Admin. Super Admins have access to the Network Admin dashboard and can manage all sites in the network, add and remove network-wide plugins and themes, and create or delete individual sites within the network.
On a Multisite network, the standard Administrator role is scoped to a single site within the network. A user who is an Administrator on Site A does not automatically have Administrator access on Site B. This makes Multisite a useful architecture for agencies managing multiple client sites, or organisations running multiple related websites under a single WordPress installation, because access can be compartmentalised cleanly between sites.
User Roles and WooCommerce
For sites running WooCommerce, managing user roles extends into the e-commerce layer. WooCommerce introduces two additional roles:
Shop Manager — can access and manage all WooCommerce settings, orders, products, coupons, and reports. Shop Manager is effectively a store-level administrator without the full site-level Administrator access. This is the correct role for e-commerce managers who need to run the store but should not be touching site settings or plugins.
Customer — automatically assigned to users who complete a purchase. Customers can log in to view their order history, manage saved addresses, and update their account details. They have no editorial or administrative access of any kind.
WooCommerce also integrates with the Members and User Role Editor plugins, allowing you to create custom roles for specific e-commerce use cases — such as a wholesale customer role that sees trade pricing, or a returns manager role with specific order editing permissions.
Security Best Practices for User Permissions
Audit your user list regularly
Set a calendar reminder — quarterly is appropriate for most sites, monthly for sites with frequent team changes — to review every user account on your site. For each account, ask: is this person still active? Do they still need this level of access? Has their role changed? Delete accounts that are no longer needed, downgrade roles that are more permissive than the person’s current responsibilities require, and reset passwords for any accounts that have not been accessed recently.
The WP Last Login plugin adds a last login column to the Users screen, which makes this audit significantly faster — you can immediately see which accounts have been inactive for months.
Enable two-factor authentication on all admin accounts
Two-factor authentication (2FA) requires a user to verify their identity with a second factor — typically a code from an authenticator app — in addition to their password. For Administrator and Editor accounts, 2FA should be mandatory. A compromised password alone is not enough to gain access to the account; the attacker also needs physical access to the authenticator device.
Plugins like Two Factor (the official WordPress.org plugin) or WP 2FA make this straightforward to implement and enforce across specific roles.
Rename or remove the default “admin” username
The username “admin” is the first credential that brute-force bots try when attacking a WordPress login page. If any account on your site still uses “admin” as its username, it is significantly easier to target. WordPress does not allow usernames to be changed through the dashboard once set, but you can create a new account with a unique username, transfer any content from the old account to the new one, and delete the original “admin” account.
Limit login attempts
By default, WordPress allows unlimited login attempts. Installing a plugin like Limit Login Attempts Reloaded or WP Cerber Security adds lockout functionality — after a specified number of failed attempts, the IP address is temporarily blocked. This effectively stops brute-force attacks from being viable.
Monitor user activity with an audit log
For any site with multiple users, an audit log plugin is essential. WP Activity Log records every action taken on the site — content changes, setting modifications, plugin activations, login attempts, user account changes — and attributes each action to a specific user account. This gives you full accountability across your team and means that if something goes wrong, you can trace exactly what happened and who did it.
Use application passwords for integrations
If you have third-party tools, APIs, or plugins that need to authenticate with your WordPress site, use Application Passwords (built into WordPress since version 5.6) rather than sharing actual user credentials. Application Passwords are revocable, can be scoped to specific users, and do not give the connecting application access to the full WordPress interface — only the REST API endpoints it needs.
A Practical Role Assignment Framework
When adding any new user to your WordPress site, run through this decision sequence before assigning a role:
Does this person need to manage plugins, themes, settings, or other users? If yes → Administrator. If no, continue.
Does this person need to edit or publish content written by others? If yes → Editor. If no, continue.
Does this person need to independently publish their own content? If yes → Author. If no, continue.
Does this person need to write content that goes through editorial review before publishing? If yes → Contributor. If no, continue.
Does this person need any editorial access at all, or just access to a member area? If member area only → Subscriber.
This sequence takes approximately thirty seconds to run through and eliminates the most common role assignment errors entirely. Apply it every time, without exception.
Summary
Managing user roles and permissions in WordPress is not a one-time setup task — it is an ongoing discipline. Assign roles based on what each person actually needs using the principle of least privilege. Use the correct role for each type of user rather than defaulting to Administrator for convenience. Create individual accounts for every person rather than sharing credentials. Audit your user list regularly and remove access the moment it is no longer needed. Enable two-factor authentication on all high-privilege accounts and monitor activity with an audit log plugin.
The five default WordPress roles — Administrator, Editor, Author, Contributor, and Subscriber — cover the vast majority of use cases when applied correctly. For more complex requirements, custom roles through plugins like User Role Editor give you the granular control to build exactly the permission structure your site needs. Getting this right is one of the simplest and most effective security improvements available to any WordPress website owner.
If you need help reviewing your website’s user access structure, or if you are managing a complex multi-user WordPress environment and want expert support, the technical support team at Matrix Internet can audit your setup and help you build a permissions framework that keeps your website secure and your team working efficiently.
At Matrix Internet, our technical support team helps businesses lock down their WordPress security — auditing user accounts, configuring the right roles and permissions, and putting the monitoring in place to keep your site protected as your team grows and changes.
FAQs
For most sites, one or two Administrator accounts is the appropriate number — typically the site owner and a lead developer or IT manager. Every additional Administrator account is an additional attack surface. If someone only needs to manage content, publish posts, or write articles, a lower role covers that entirely. The most common mistake site owners make is assigning Administrator access by default because it is easier than thinking through what the person actually needs. Run through the role decision framework — if Editor, Author, or Contributor covers the task, use that role instead.
Yes — you can change a user's role at any time from the WordPress dashboard. Go to Users → All Users, hover over the user's name, click Edit, and update the Role field. You can also bulk-change roles by selecting multiple users on the All Users screen and using the Change Role dropdown. Role changes take effect immediately. There is no limit to how many times a role can be changed, which makes it easy to temporarily elevate someone's access for a specific task and then reduce it again once the task is complete.
When you delete a user in WordPress, you are prompted to either reassign their content to another user or delete it permanently. Always choose to reassign rather than delete, unless you are certain the content is no longer needed. Posts, pages, and media attributed to the deleted account will be transferred to whichever user you specify. This means the content remains on the site and fully accessible — the only thing that changes is the author attribution. If you are removing a former team member, reassigning their content to an active Editor or Administrator is the clean and safe approach.
Giving a developer Administrator access is often necessary for them to do their job, but it should be treated as temporary rather than permanent. Create a dedicated account specifically for the developer rather than sharing your own credentials, ensure they use a strong unique password and enable two-factor authentication, and remove or downgrade the account once the work is complete. If the developer needs ongoing access for maintenance, consider whether a more restricted custom role would cover their requirements. The key principle is that access should match the current need — not be granted indefinitely based on a past need.
By Srdjan


